TM 10-4320-307-24
4-17
CRANKSHAFT ASSEMBLY REPLACE REPA/R (CONT)
NOTE
Locate main bearing caps in accordance with match marks made during removal.
Install caps starting from center and working toward front and rear bearings.
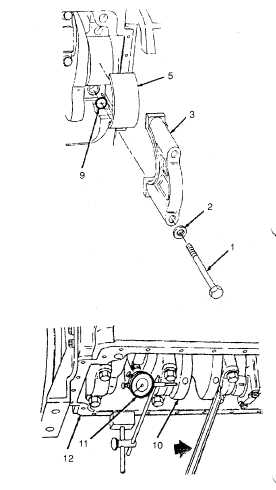
12. Install main bearing caps (3) No. 1 through 6 as
follows:
a.
Align capscrew holes in cap (3) with holes in
cylinder block. Make sure main bearing ring
(9) and lower bearing shell (5) are properly
positioned.
b.
Install washers and capscrews and hand
tighten.
NOTE
When hitting the cap, make sure the
bearing shell and dowel ring do not
move.
c.
Hit cap with a rubber hammer to push it
into correct position.
d.
Tighten capscrews (1) as follows:
(1) Tighten both to 110 ft-lbs (150 N•m).
(2) Tighten both to 210 ft-lbs (285 N•m).
(3) Tighten both to 305 ft-lbs (415 N•m).
(4) Loosen both completely.
(5) Repeat steps (1) through (3).
e.
Measure end clearance of crankshaft (10)
as follows:
(1) Set up dial indicator (11) on oil pan
flange (12).
(2) Put plunger of indicator against crank-
shaft counterweight.
(3) Push crankshaft toward rear of cylinder
block.
(4) Set dial indicator at 0.
(5) Push crankshaft (10) toward front of
cylinder block.
4-134