TM 10-4320-307-24
4-17
CRANKSHAFT ASSEMBLY REPLACE, REFPAIR (CONT)
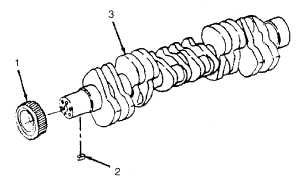
DISASSEMBLY:
NOTE
Crankshaft gear need not be removed unless it is damaged or worn and requires replacement.
1.
Install crankshaft gear puller and gear puller jaw
on gear (1).
2.
Turn pressure screw on gear puller clockwise to
remove gear (1).
CAUTION
Do not damage crankshaft when re-
moving key.
3.
Use a flat chisel and hammer to remove crankshaft gear key (2) from crankshaft (3). Discard gear key
4.
Inspect crankshaft keyway and gear fit area for burrs or damage.
5.
Remove any burrs with fine crocus cloth.
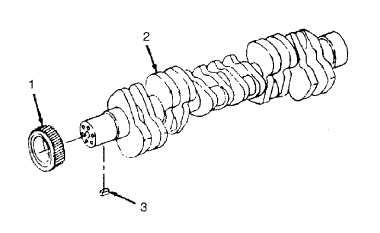
ASSEMBLY:
1
Measure bore of new crankshaft gear (1). Bore must measure between 3.7557 and 3.7565 inches (95.394 and
95.415).
2.
Measure gear fit area of crankshaft (2). This area must measure between 3.7600 and 3.7607 inches
(95.504 and
95.522 mm).
3.
Use a leather hammer to install new key (3) in crankshaft keyway.
4.
Heat crankshaft gear (1) in an oven for a minimum of one hour at 400°F (205-C).
Wear protective gloves when han-
dling heated gear.
NOTE
The gear must be installed within 30
seconds after being removed from oven.
5.
Remove crankshaft gear (1) from oven.
NOTE
The timing mark and gear part
number must be facing away from
the crankshaft.
6.
Align gear keyway with key in crankshaft (2),
and install gear firmly on crankshaft.
4-131