TM 10-4320-226-14
4.13.9. Run Relay (K2) Replacement
This task covers:
4.13.9.1
Removal
4.13.9.2
Installation
INITIAL SETUP
Tools
General Safety Instructions
General Mechanic’s Tool Kit (Appendix B, Section III,
Item 1)
To prevent rolling or sliding, do not work on equipment
that is not securely stabilized.
Materials/Pa@
Tags (Appendix E, Section II, Item 12)
Do not work on equipment without following standard
shop safety precautions.
Equipment Conditions
Engine shutdown (refer to paragraph 2.5.1.2 or 2.5.2.2
4.13.9.1
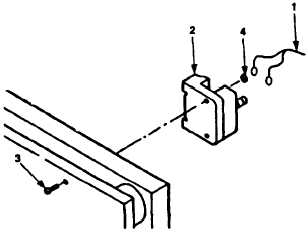
Removal. Refer to Figure 4-49 and proceed as follows:
To prevent rolling or sliding, do not work on equipment that is not securely stabilizes.
Ensure both wheels are chocked. Failure to obey these warnings may result in serious
injury.
a.
Tag and disconnect wires (1) from relay (2).
b.
Remove two screws (3) and nuts (4) from front of control panel.
c.
Remove relay (2) from control panel.
4.13.9.2
Installation.
Refer to Figure 4-49 and proceed as follows:
a.
Position relay (2) in place on back of control panel.
b.
Install two nuts (4) and screws (3) into relay (2) through front of control panel.
C.
Connect wires (1) to relay (2) and remove tags.
Figure 4-49. Run Relay (K2) Replacement.
4-91